Creating Transaction Levy expense, add a user to the transaction levy report, paying the transaction levy, set-up the transaction levy
Summary:
- How to set-up the Transaction Levy;
- Add a user to the transaction levy report;
- Creating an Expense as a Transaction Levy;
- Accessing and Creating the Transaction Levy Report;
- Paying the Transaction Levy. Write a Cheque directly using the Operating Out functionality;
- Tips and Tricks with FAQ's.
1. How to Set-up the Transaction Levy
a) Click on the Admin -> Firm -> Settings tab. Then in the submenu area click on the "Provincial" option;
b) Click on the "Ontario" or "Newfoundland and Labrador" Section;
c) Click on the Transaction Levy radio button. Make any required adjustments (optional);
d) Press the "Save" button in the bottom left.
e) This will make the "Levy" Column available on the Expenses screen.
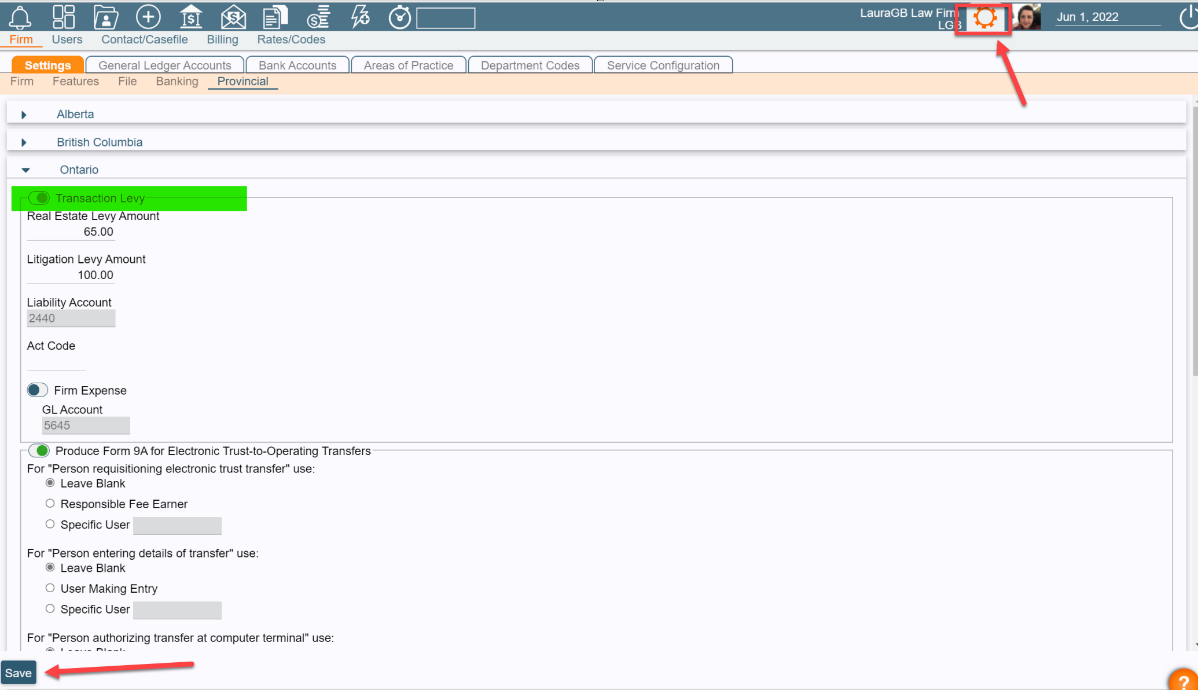
f) Click on Admin -> Firm -> Areas of Practice tab.
g) Edit the “Litigation” and “Real Estate” AOP values to set them as a specific Transaction Levy Type.

2. Add a Soluno Userid to the transaction levy report:
ADMIN -> UISERS -> USER tab.
Edit the Lawyer. In the "Associations" sub-menu put in the Law Society Number.
Press "Save".

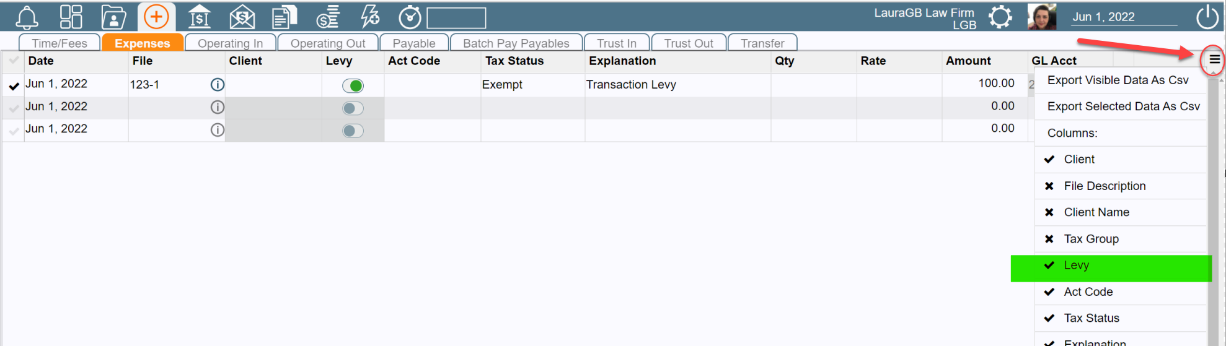
2. Creating an Expense as a Transaction Levy
a) Click on the Data Entry Icon -> Expenses tab. Put in the file number and click on the "Levy" button. This will populate the Amount field and the GL Number.
b) Choose the Tax Status from the dropdown list.
c) Click in the very first column of the transaction line to put a "checkmark" on the transaction line. Then press "Save".

3. Accessing and Creating the Transaction Levy Report
a). Click on Reports Icon -> Other -> Transaction Levy tab

b) Click on the chevron / checkmark type icon to display the report options (outlined in green above).
c) Click under the "View" option in the top left of the screen to get a dropdown list of the reports available.
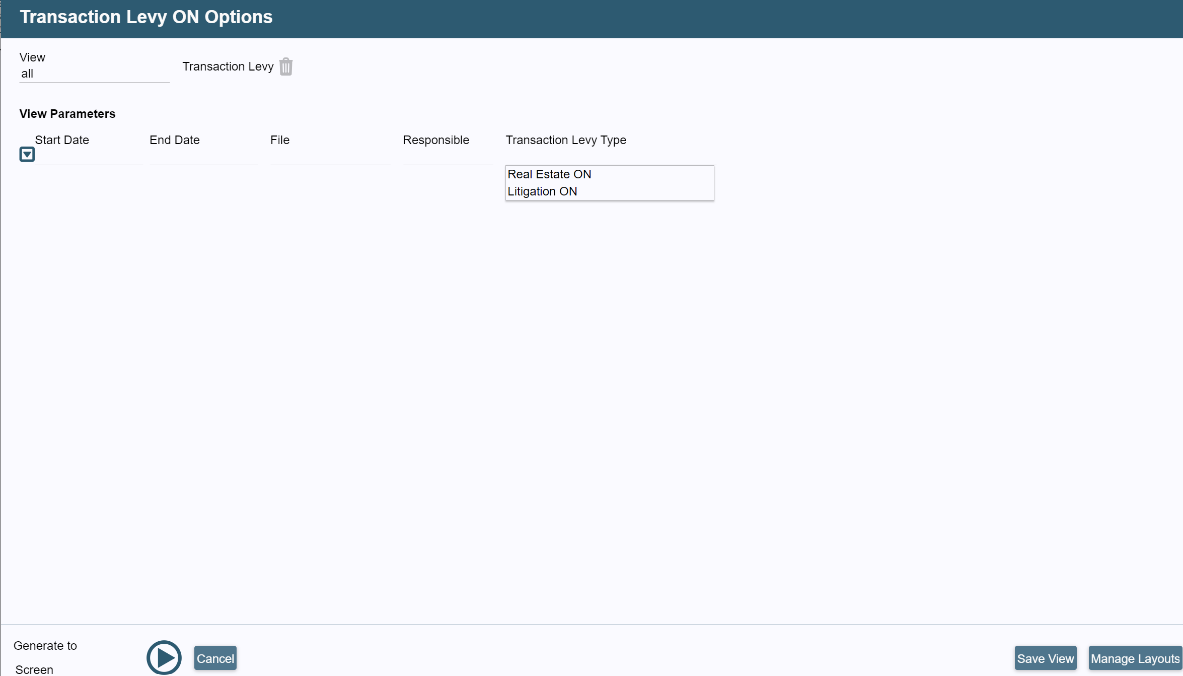
d) Press the "Play" button in the bottom left to view the report.
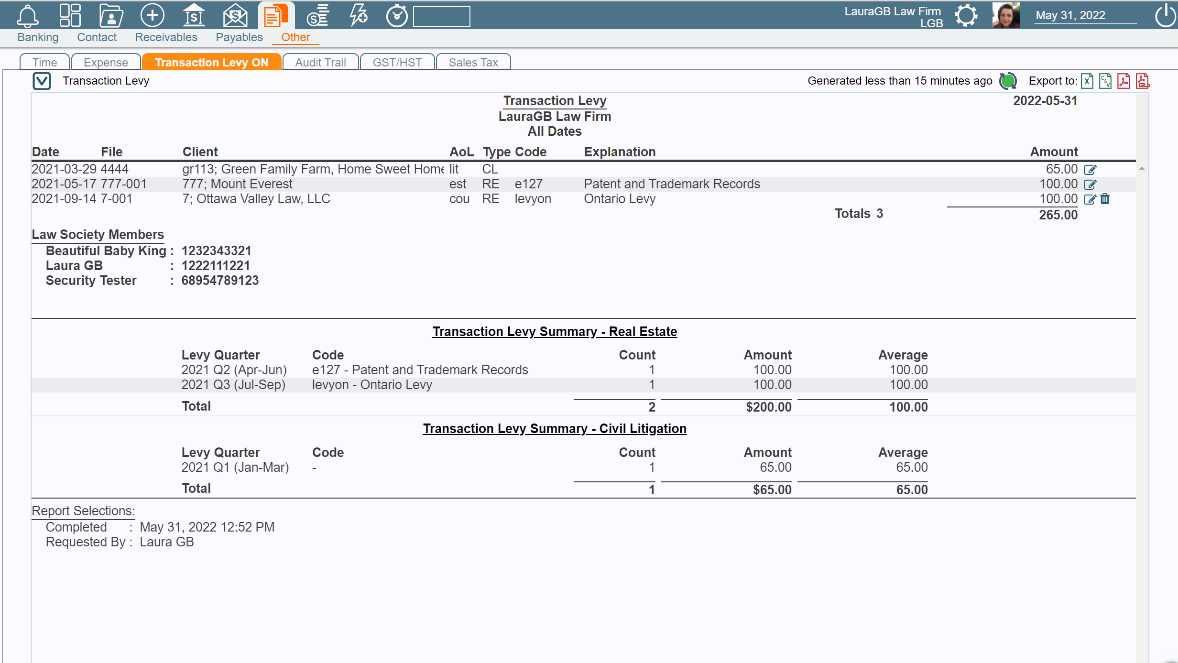
e) Print and save the report using the "PDF" icon in the top right corner of the screen or, make note of the amount to be paid. In this case $265.00
4. Paying the Transaction Levy. Write a cheque directly using Operating Out Functionality.
Click on the Data Entry Icon -> Operating Out tab (please refer to the Operating Out Users Guide for detailed instructions).

In the above example
a) There is a Vendor defined in Soluno as a Contact;
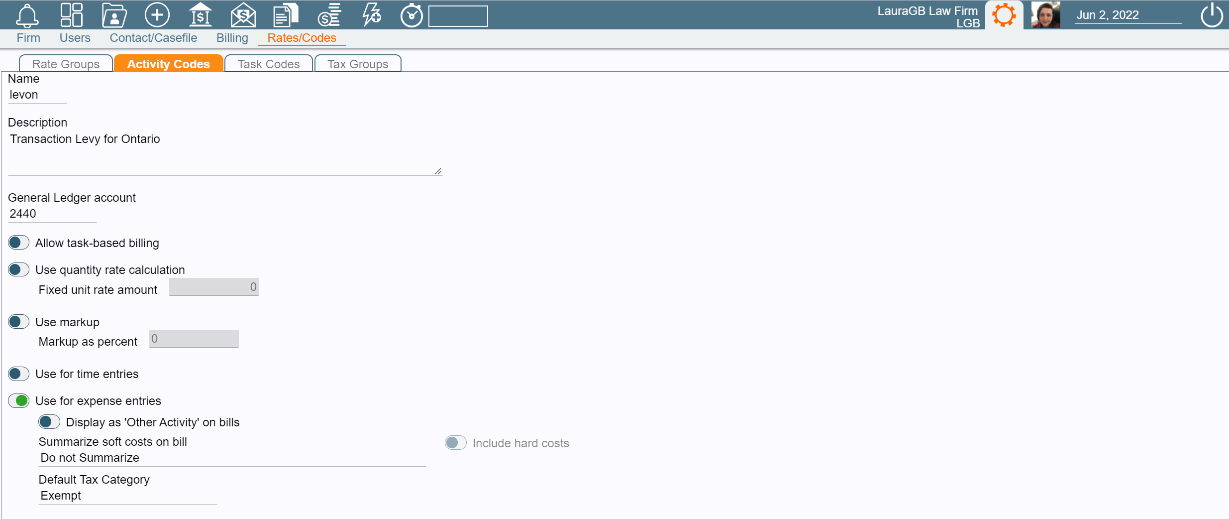
b) There is an Activity Code (levon) that, when entered into the "Act Code" line, will automatically populate the "Tax
Status", "Explanation" and the "GL Acct" number fields (along with the amount);
c) The "Print Management" action at the bottom left shows "Print Now", which will produce the cheque pdf immediately
after the "Save" button is clicked.
An Example of the Activity Code "levon" as defined in the Activity Codes list - Admin -> Rates/Codes -> Activity Code tab.
Create a Payable (Optional):
Set-up the Law Society as a "Vendor" (Is Vendor section in the Contact).
Create a payable for this vendor (Data Entry Icon -> Payable tab).
Put in the Dollar Amount as indicated in the Transaction Levy Report.
Please refer to the Payable Users Guide for more details.
Example:

If a Payable is created you will need to release the Payable in Batch Pay Payable tab or using Operating Out to pay it.
6. Tips and Tricks with FAQ's
Q: I don't see the Transaction Levy button on the "Expenses" line
A: First, make sure the Transaction Levy button is turned on in the Admin settings (see the section "How to set-up the Transaction Levy".
Click on the "Columns" icon in the top right corner of the screen to make sure "Transaction Levy" column is being displayed.
Q: My Transaction Levy Report amount does not match the amount in the Transaction Levy GL Account. Why not?
A: The Transaction Levy Report will calculate the total amount of Expense entries that were entered using the Transaction Levy button. If Expenses were entered to the GL directly and the button was not pressed to identify it as a Transaction Levy then that expense will not be calculated in the total on the report.
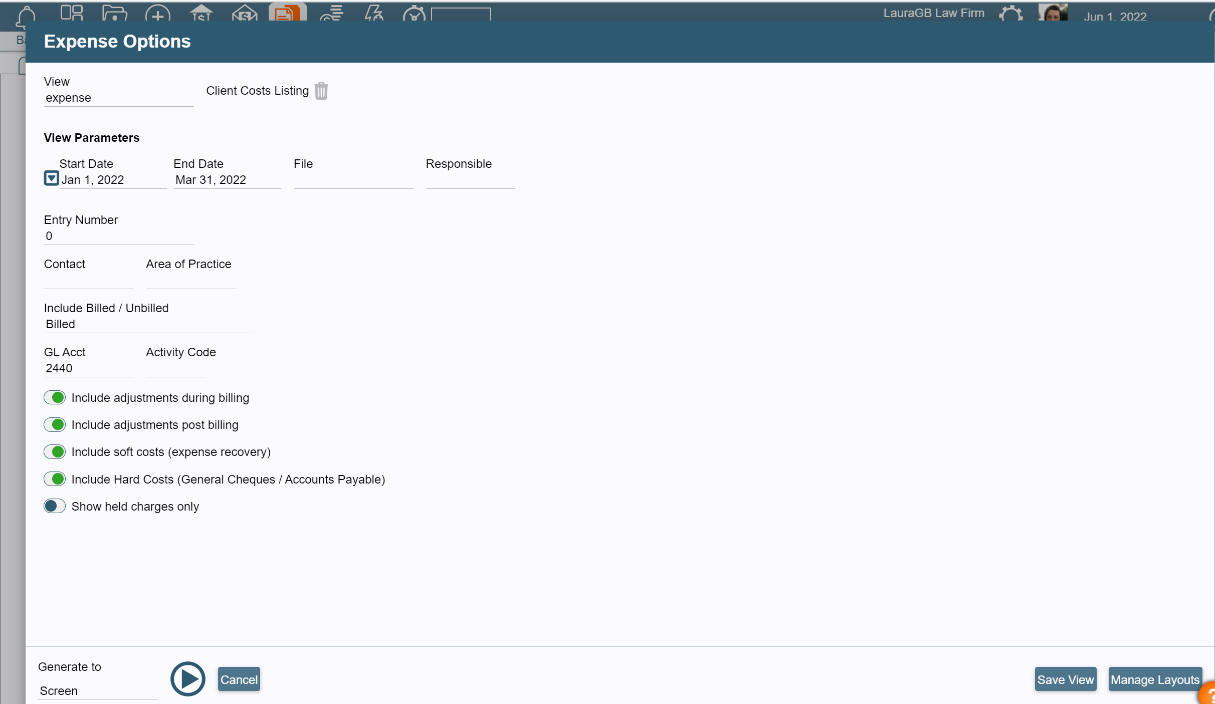
i) To verify this is what has happened, run an Expenses report. Click on Reports -> Other -> Expenses tab.
ii) Click on the chevron / checkmark type icon to display the Options screen.
iii) In the Options screen click in the "View" area to show the list of reports. Choose the "Cost Listing" report.
iv) Put in the start and end dates for the Transaction Levy period. Put in the GL Number "2440".
v) Press the Play button. This will give a listing of all the entries that were put into the system using the Transaction Levy GL Number.
vi) This Report should match the GL Account number in the General Ledger report.
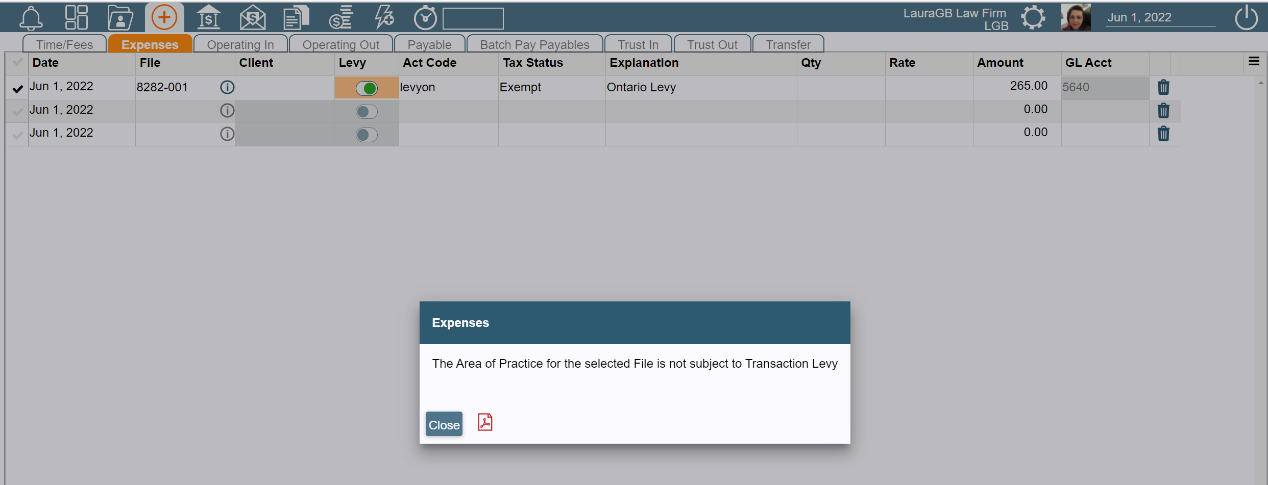
Q: When I turn on the Transaction Levy button I automatically get an error message and then the button turns off again "Area of Practice is not subject to Transaction Levy"
A: Please go to the client file and change the AOP on the file to either a "Litigation" or "Real Estate" type. If the AOP is correct then check the Admin -> Frim -> Settings -> Area of Practice tab, to make sure they are identified as Transaction Levy types.


Was this article helpful?
That’s Great!
Thank you for your feedback
Sorry! We couldn't be helpful
Thank you for your feedback
Feedback sent
We appreciate your effort and will try to fix the article